# 1. 多视图
如果我们想在同一场景中绘制多个视图,主要有两种方法:
渲染纹理
缺点: 它要求我们分配纹理,将内容渲染到它们,然后在画布上渲染这些纹理。这意味着我们实际上是双重渲染。可以用于绘制后视镜。
设置视口并打开剪刀测试
# 1.1 设置视口
我们通过调用gl.viewport()来设置视口。设置 WebGL 如何从裁剪空间转换为像素空间。
gl.viewport(left, bottom, width, height);
最常见的就是分别设置为 0、0、gl.canvas.width和gl.canvas.height来覆盖整个画布。我们其实也可以通过设置left, bottom, width, height的值来绘制画布的一部分。
下面我们来你看一个在同一个视图中同时使用正交投影和透视投影的例子。
- 顶点着色器代码
// 顶点着色器
attribute vec4 a_position;
attribute vec4 a_color;
uniform mat4 u_matrix;
varying vec4 v_color;
void main() {
  // 将位置乘以矩阵。
  gl_Position = u_matrix * a_position;

  // 将顶点颜色传递给片段着色器。
  v_color = a_color;
}
- 片元着色器代码
// 片段着色器
precision mediump float;
// 从顶点着色器传入
varying vec4 v_color;
void main() {
  gl_FragColor = v_color;
}
- 绘制模型
function drawScene(projectionMatrix, cameraMatrix, worldMatrix) {
  // 从相机矩阵创建一个视图矩阵。
  const viewMatrix = m4.inverse(cameraMatrix);

  // 将它们相乘以形成 worldViewProjection 矩阵。
  let mat = m4.multiply(projectionMatrix, viewMatrix);
  mat = m4.multiply(mat, worldMatrix);

  gl.useProgram(programInfo.program);

  // ------ 绘制 F --------

  // 设置所有需要的属性。
  webglUtils.setBuffersAndAttributes(gl, programInfo, bufferInfo);

  // 设置矩阵
  webglUtils.setUniforms(programInfo, {
    u_matrix: mat,
  });
  // 调用 gl.drawArrays 或 gl.drawElements
  webglUtils.drawBufferInfo(gl, bufferInfo);
}
- 渲染场景
我们通过
gl.viewport将画布分成两个部分,然后分别使用不同的投影矩阵来绘制。
function render() {
  webglUtils.resizeCanvasToDisplaySize(gl.canvas);
  gl.enable(gl.CULL_FACE);
  gl.enable(gl.DEPTH_TEST);

  // 我们将把视图分成 2 个
  const {clientWidth,clientHeight} = gl.canvas;
  const effectiveWidth = clientWidth / 2;
  const aspect = effectiveWidth / clientHeight;
  const near = 1;
  const far = 2000;

  // 计算透视投影矩阵
  const perspectiveProjectionMatrix =
      m4.perspective(fieldOfViewRadians, aspect, near, far);

  // 计算正交投影矩阵
  const halfHeightUnits = 120;
  const orthographicProjectionMatrix = m4.orthographic(
      -halfHeightUnits * aspect,  // 左边
       halfHeightUnits * aspect,  // 正确的
      -halfHeightUnits,           // 底部
       halfHeightUnits,           // 顶部
       -75,                       // 靠近
       2000);                     // 远的

  // 使用观察计算相机的矩阵。
  const cameraPosition = [0, 0, -75];
  const target = [0, 0, 0];
  const up = [0, 1, 0];
  const cameraMatrix = m4.lookAt(cameraPosition, target, up);

  let worldMatrix = m4.yRotation(degToRad(settings.rotation));
  worldMatrix = m4.xRotate(worldMatrix, degToRad(settings.rotation));
  // 将“F”置于其原点的中心
  worldMatrix = m4.translate(worldMatrix, -35, -75, -5);

  const leftWidth = effectiveWidth / 2 | 0;
  const height = clientHeight;
  // 使用正交相机在左侧绘制
  gl.viewport(0, 0, leftWidth, height);

  drawScene(orthographicProjectionMatrix, cameraMatrix, worldMatrix);

  // 使用透视相机在右侧绘制
  const rightWidth = clientWidth - leftWidth;
  gl.viewport(leftWidth, 0, rightWidth, height);

  drawScene(perspectiveProjectionMatrix, cameraMatrix, worldMatrix);
}
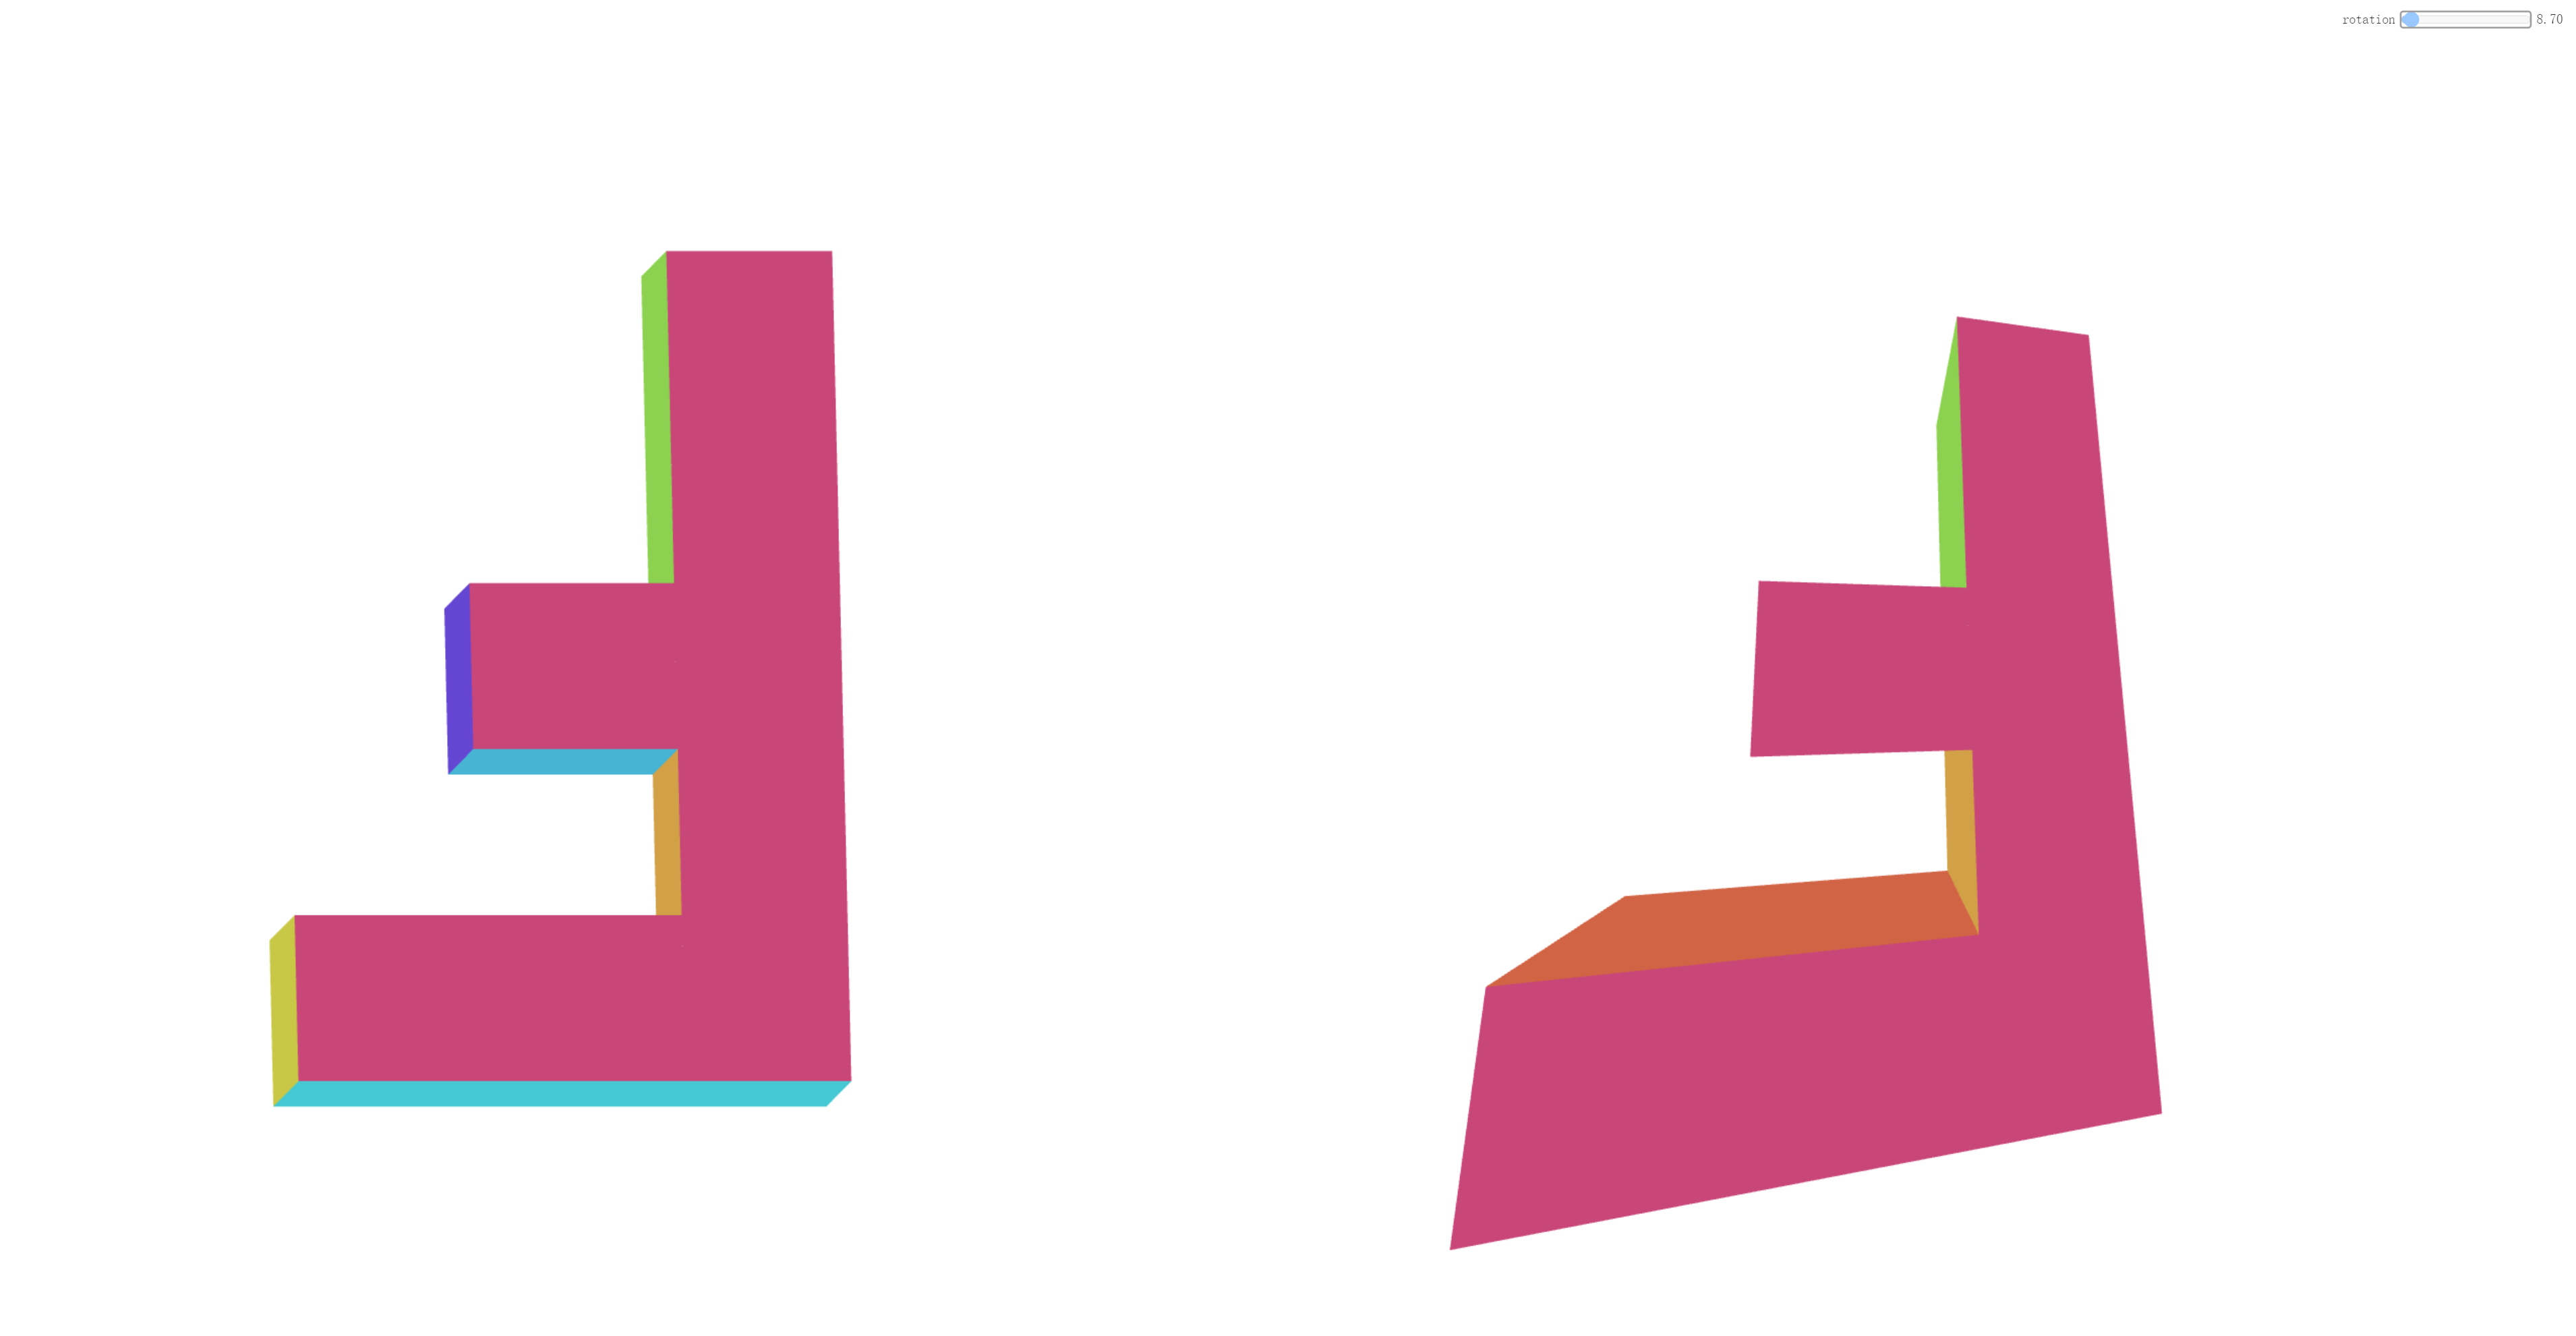
上面的效果如下:
但是如果当我们调用gl.clear时,它会清除画布的。
function drawScene(projectionMatrix, cameraMatrix, worldMatrix) {
    // 清除画布和深度缓冲区。
    gl.clear(gl.COLOR_BUFFER_BIT | gl.DEPTH_BUFFER_BIT);
    ...
}
并且在我们调用drawScene之前,设置画布的颜色
// 使用正交相机在左侧绘制
gl.viewport(0, 0, leftWidth, height);
gl.clearColor(1, 0, 0, 1);  // 红色的

drawScene(orthographicProjectionMatrix, cameraMatrix, worldMatrix);

// 使用正交相机在左侧绘制
const rightWidth = width - leftWidth;
gl.viewport(leftWidth, 0, rightWidth, height);
gl.clearColor(0, 0, 1, 1);  // 蓝色的
你会发现左边什么都没有了,因为gl.clearColor设置的是整个画布的颜色。
![]()
想要解决上面的问题,我们可以使用gl.scissor,来开启剪刀测试。
gl.enable(gl.SCISSOR_TEST);
与视口类似,它默认为画布的初始大小,但我们可以通过调用 gl.scissor以下命令设置与视口相同的参数。
gl.scissor(left, bottom, width, height);
我们可以在渲染场景函数render中设置gl.scissor。
function render() {
  webglUtils.resizeCanvasToDisplaySize(gl.canvas);

  gl.enable(gl.CULL_FACE);
  gl.enable(gl.DEPTH_TEST);
  gl.enable(gl.SCISSOR_TEST);

  ...

  const {width, height} = gl.canvas;
  const leftWidth = width / 2 | 0;

  // 使用正交相机在左侧绘制
  gl.viewport(0, 0, leftWidth, height);
  gl.scissor(0, 0, leftWidth, height);
  gl.clearColor(1, 0, 0, 1);  // 红色的

  drawScene(orthographicProjectionMatrix, cameraMatrix, worldMatrix);

  // 使用正交相机在左侧绘制
  const rightWidth = width - leftWidth;
  gl.viewport(leftWidth, 0, rightWidth, height);
  gl.scissor(leftWidth, 0, rightWidth, height);
  gl.clearColor(0, 0, 1, 1);  // 蓝色的

  drawScene(perspectiveProjectionMatrix, cameraMatrix, worldMatrix);
}
最终的视觉效果如下所示:
![]()
demo地址 多视图 (opens new window)
# 2. 多画布
常规方法就是创建多个画布,然后使用canvas.getContext('2d')获取到CanvasRenderingContext2D对象。这个方案会有以下两个问题:
- 每个画布都需要不同的
WebGL上下文,并且WebGL上下文不能共享资源。另一个问题是大多数浏览器对它们支持的同步画布数量有限制。 - 许多浏览器最多只能支持
8个。这意味着,一旦你在第 9 个画布上创建了webgl上下文,第一个画布就会失去其上下文。
解决方案:可以通过制作一个覆盖整个窗口的大画布来解决这些问题。然后,通过创建 <div>在每个想要绘制项目的地方作为占位符放置。我们可以用 element.getBoundingClientRect 它来找出设置视口的位置,然后使用剪刀在该区域进行绘制。
核心代码如下:
- 创建缓冲区并填充各种数据
const bufferInfos = [
  primitives.createCubeBufferInfo(
      gl,
      1,  // 宽度
      1,  // 高度
      1,  // 深度
  ),
  primitives.createSphereBufferInfo(
      gl,
      0.5,  // 半径
      8,    // 周围的细分
      6,    // 向下细分
  ),
  primitives.createTruncatedConeBufferInfo(
      gl,
      0.5,  // 底部半径
      0,    // 顶部半径
      1,    // 高度
      6,    // 周围的细分
      1,    // 向下细分
  ),
];
创建
div容器里面将有一个视图和一个标签。 该视图只是一个空的
div,我们想在其中绘制项目。
function createElem(type, parent, className) {
const elem = document.createElement(type);
parent.appendChild(elem);
if (className) {
elem.className = className;
}
return elem;
}
function randArrayElement(array) {
return array[Math.random() * array.length | 0];
}
function rand(min, max) {
if (max === undefined) {
max = min;
min = 0;
}
return Math.random() * (max - min) + min;
}
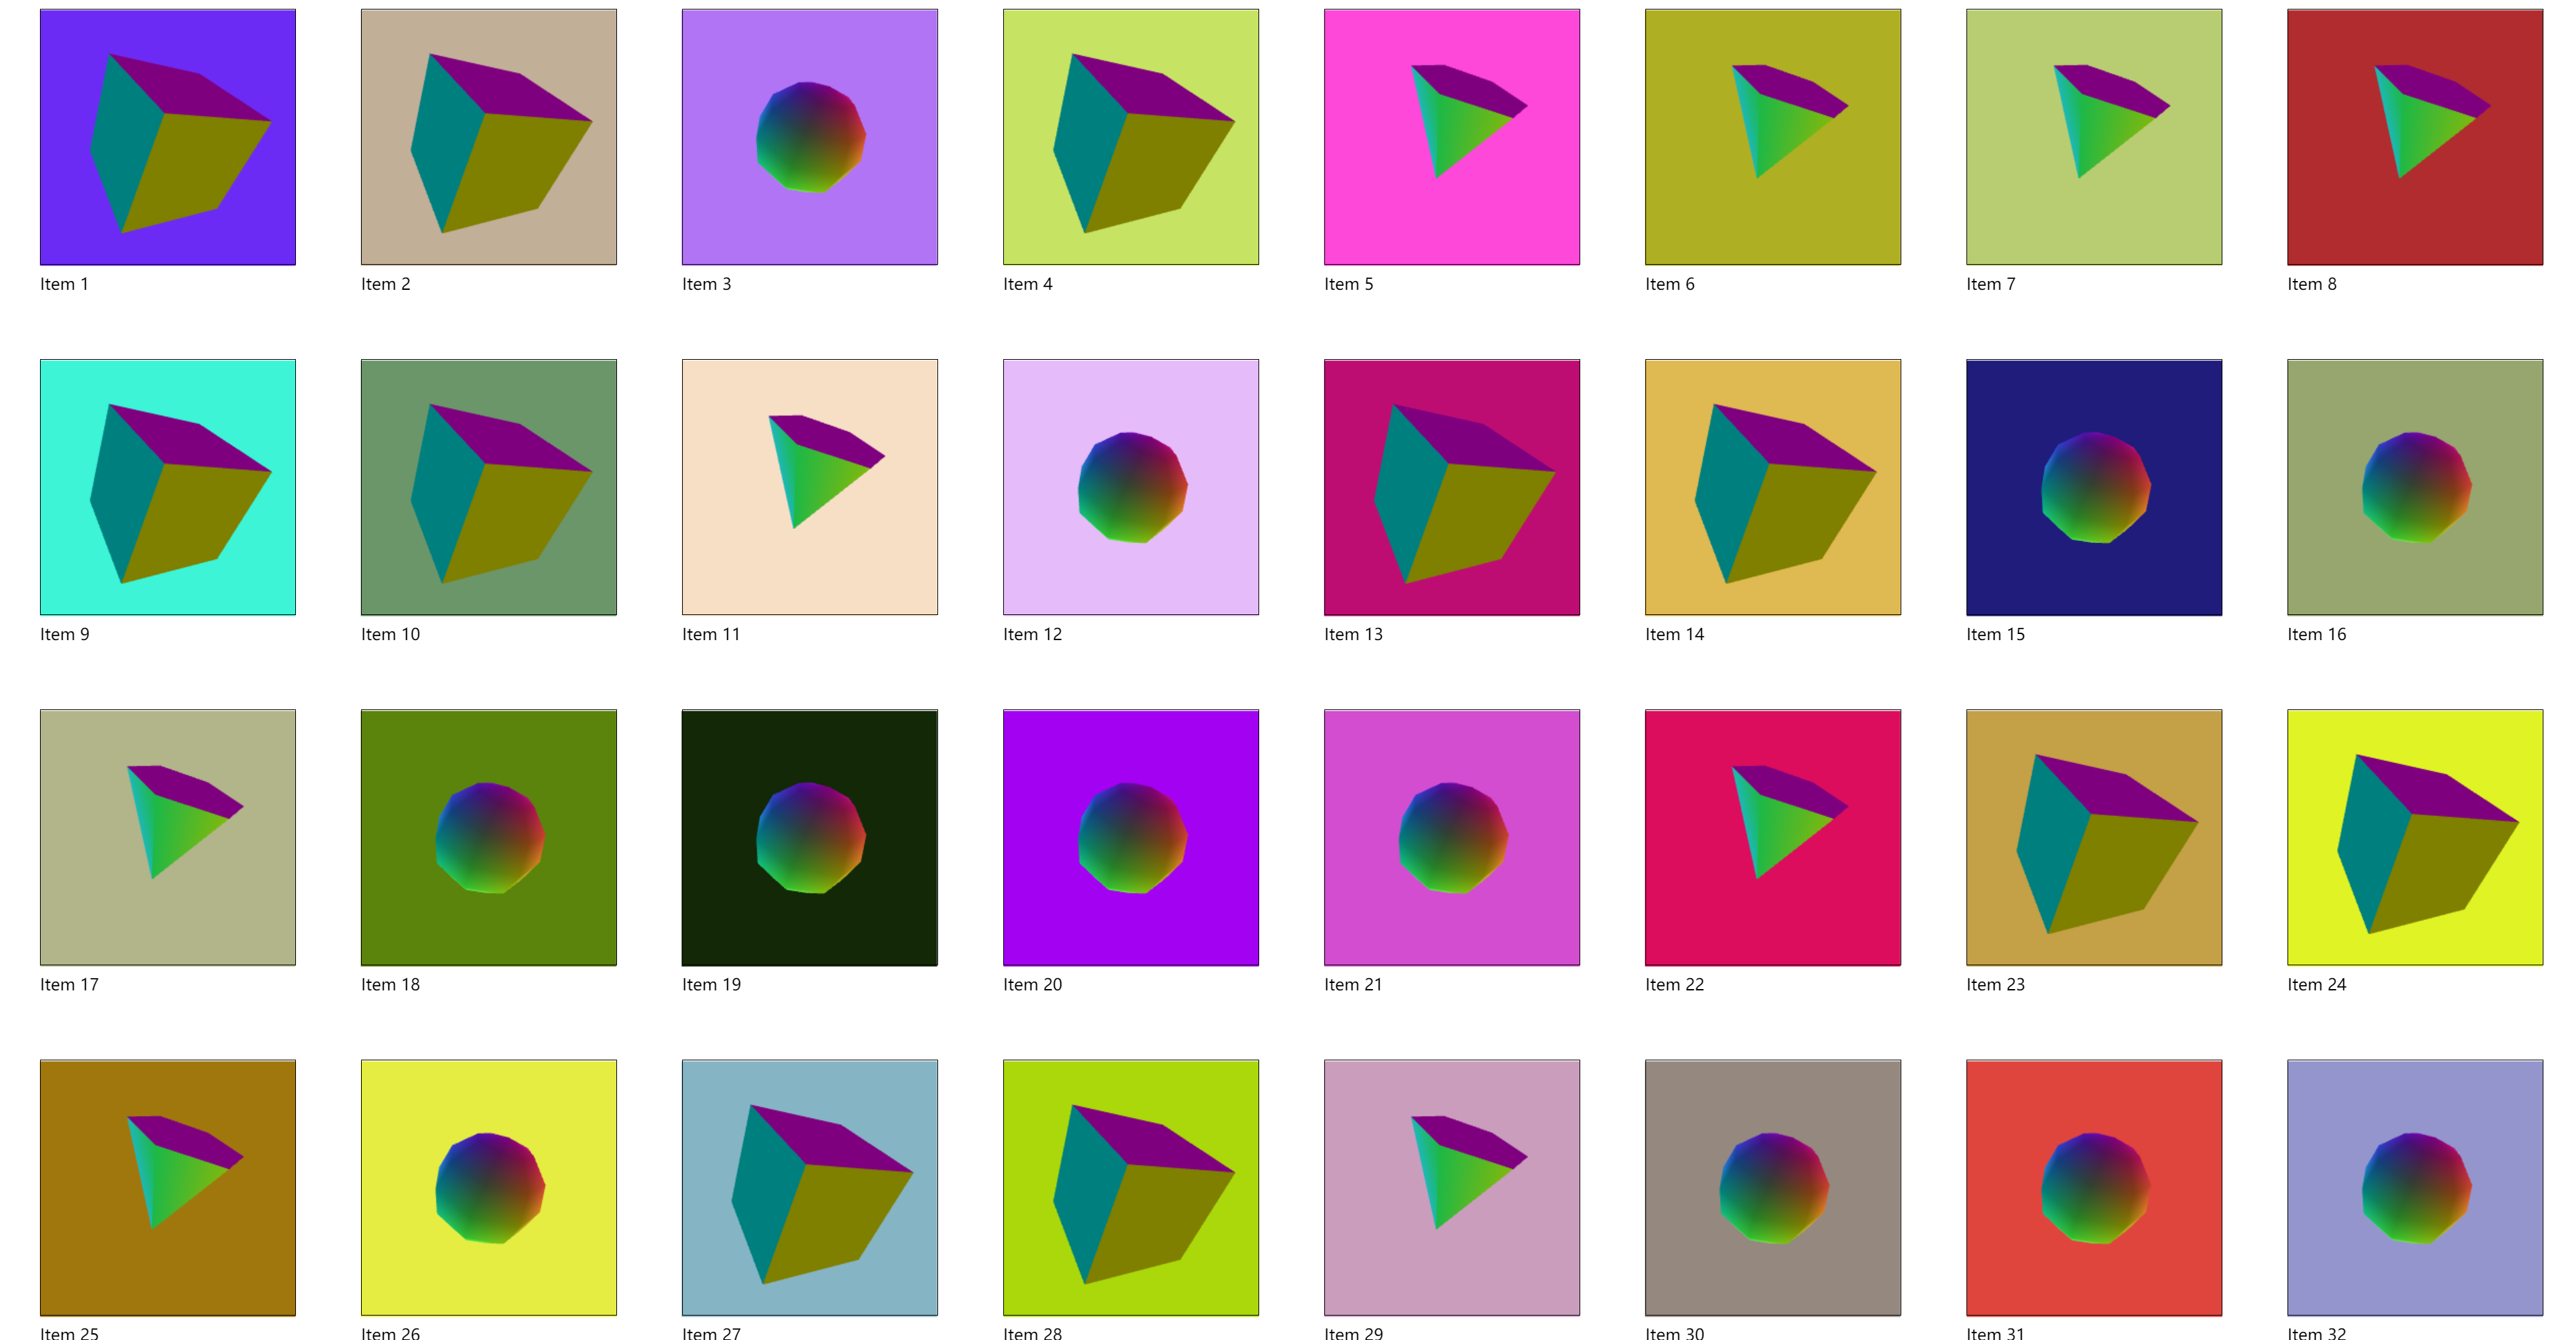
const contentElem = document.querySelector('#content');
const items = [];
const numItems = 100;
for (let i = 0; i < numItems; ++i) {
const outerElem = createElem('div', contentElem, 'item');
const viewElem = createElem('div', outerElem, 'view');
const labelElem = createElem('div', outerElem, 'label');
labelElem.textContent = `Item ${i + 1}`;
const bufferInfo = randArrayElement(bufferInfos);
const color = [rand(1), rand(1), rand(1), 1];
items.push({
bufferInfo,
color,
element: viewElem,
});
}
- 容器样式
.item {
  display: inline-block;
  margin: 1em;
  padding: 1em;
}
.label {
  margin-top: 0.5em;
}
.view {
  width: 250px;
  height: 250px;
  border: 1px solid black;
}
- 渲染函数
items数组中每个项目都有一个bufferInfo、一个color和一个element。我们一次循环遍历所有项目,然后调用element.getBoundingClientRect并使用返回的矩形来查看该元素是否与画布相交。如果相交,我们将视口和剪刀设置为匹配,然后绘制该对象。
function render(time) {
  time *= 0.001;  // 转换为秒

  webglUtils.resizeCanvasToDisplaySize(gl.canvas);

  gl.enable(gl.CULL_FACE);
  gl.enable(gl.DEPTH_TEST);
  gl.enable(gl.SCISSOR_TEST);

  // 将画布移动到当前滚动位置的顶部
gl.canvas.style.transform = `translateX(${window.scrollX}px) translateY(${window.scrollY}px)`;

  for (const {bufferInfo, element, color} of items) {
    const rect = element.getBoundingClientRect();
    if (rect.bottom < 0 || rect.top  > gl.canvas.clientHeight ||
        rect.right  < 0 || rect.left > gl.canvas.clientWidth) {
      continue;  // 它不在屏幕上
    }

    const width  = rect.right - rect.left;
    const height = rect.bottom - rect.top;
    const left   = rect.left;
    const bottom = gl.canvas.clientHeight - rect.bottom;

    gl.viewport(left, bottom, width, height);
    gl.scissor(left, bottom, width, height);
    gl.clearColor(...color);

    const aspect = width / height;
    const near = 1;
    const far = 2000;

    // 计算透视投影矩阵
    const perspectiveProjectionMatrix =
        m4.perspective(fieldOfViewRadians, aspect, near, far);

    // 使用观察计算相机的矩阵。
    const cameraPosition = [0, 0, -2];
    const target = [0, 0, 0];
    const up = [0, 1, 0];
    const cameraMatrix = m4.lookAt(cameraPosition, target, up);

    // 旋转项目
    const rTime = time * 0.2;
    const worldMatrix = m4.xRotate(m4.yRotation(rTime), rTime);

    drawScene(perspectiveProjectionMatrix, cameraMatrix, worldMatrix, bufferInfo);
  }
  requestAnimationFrame(render);
}
requestAnimationFrame(render);
最终的视觉效果如下所示:
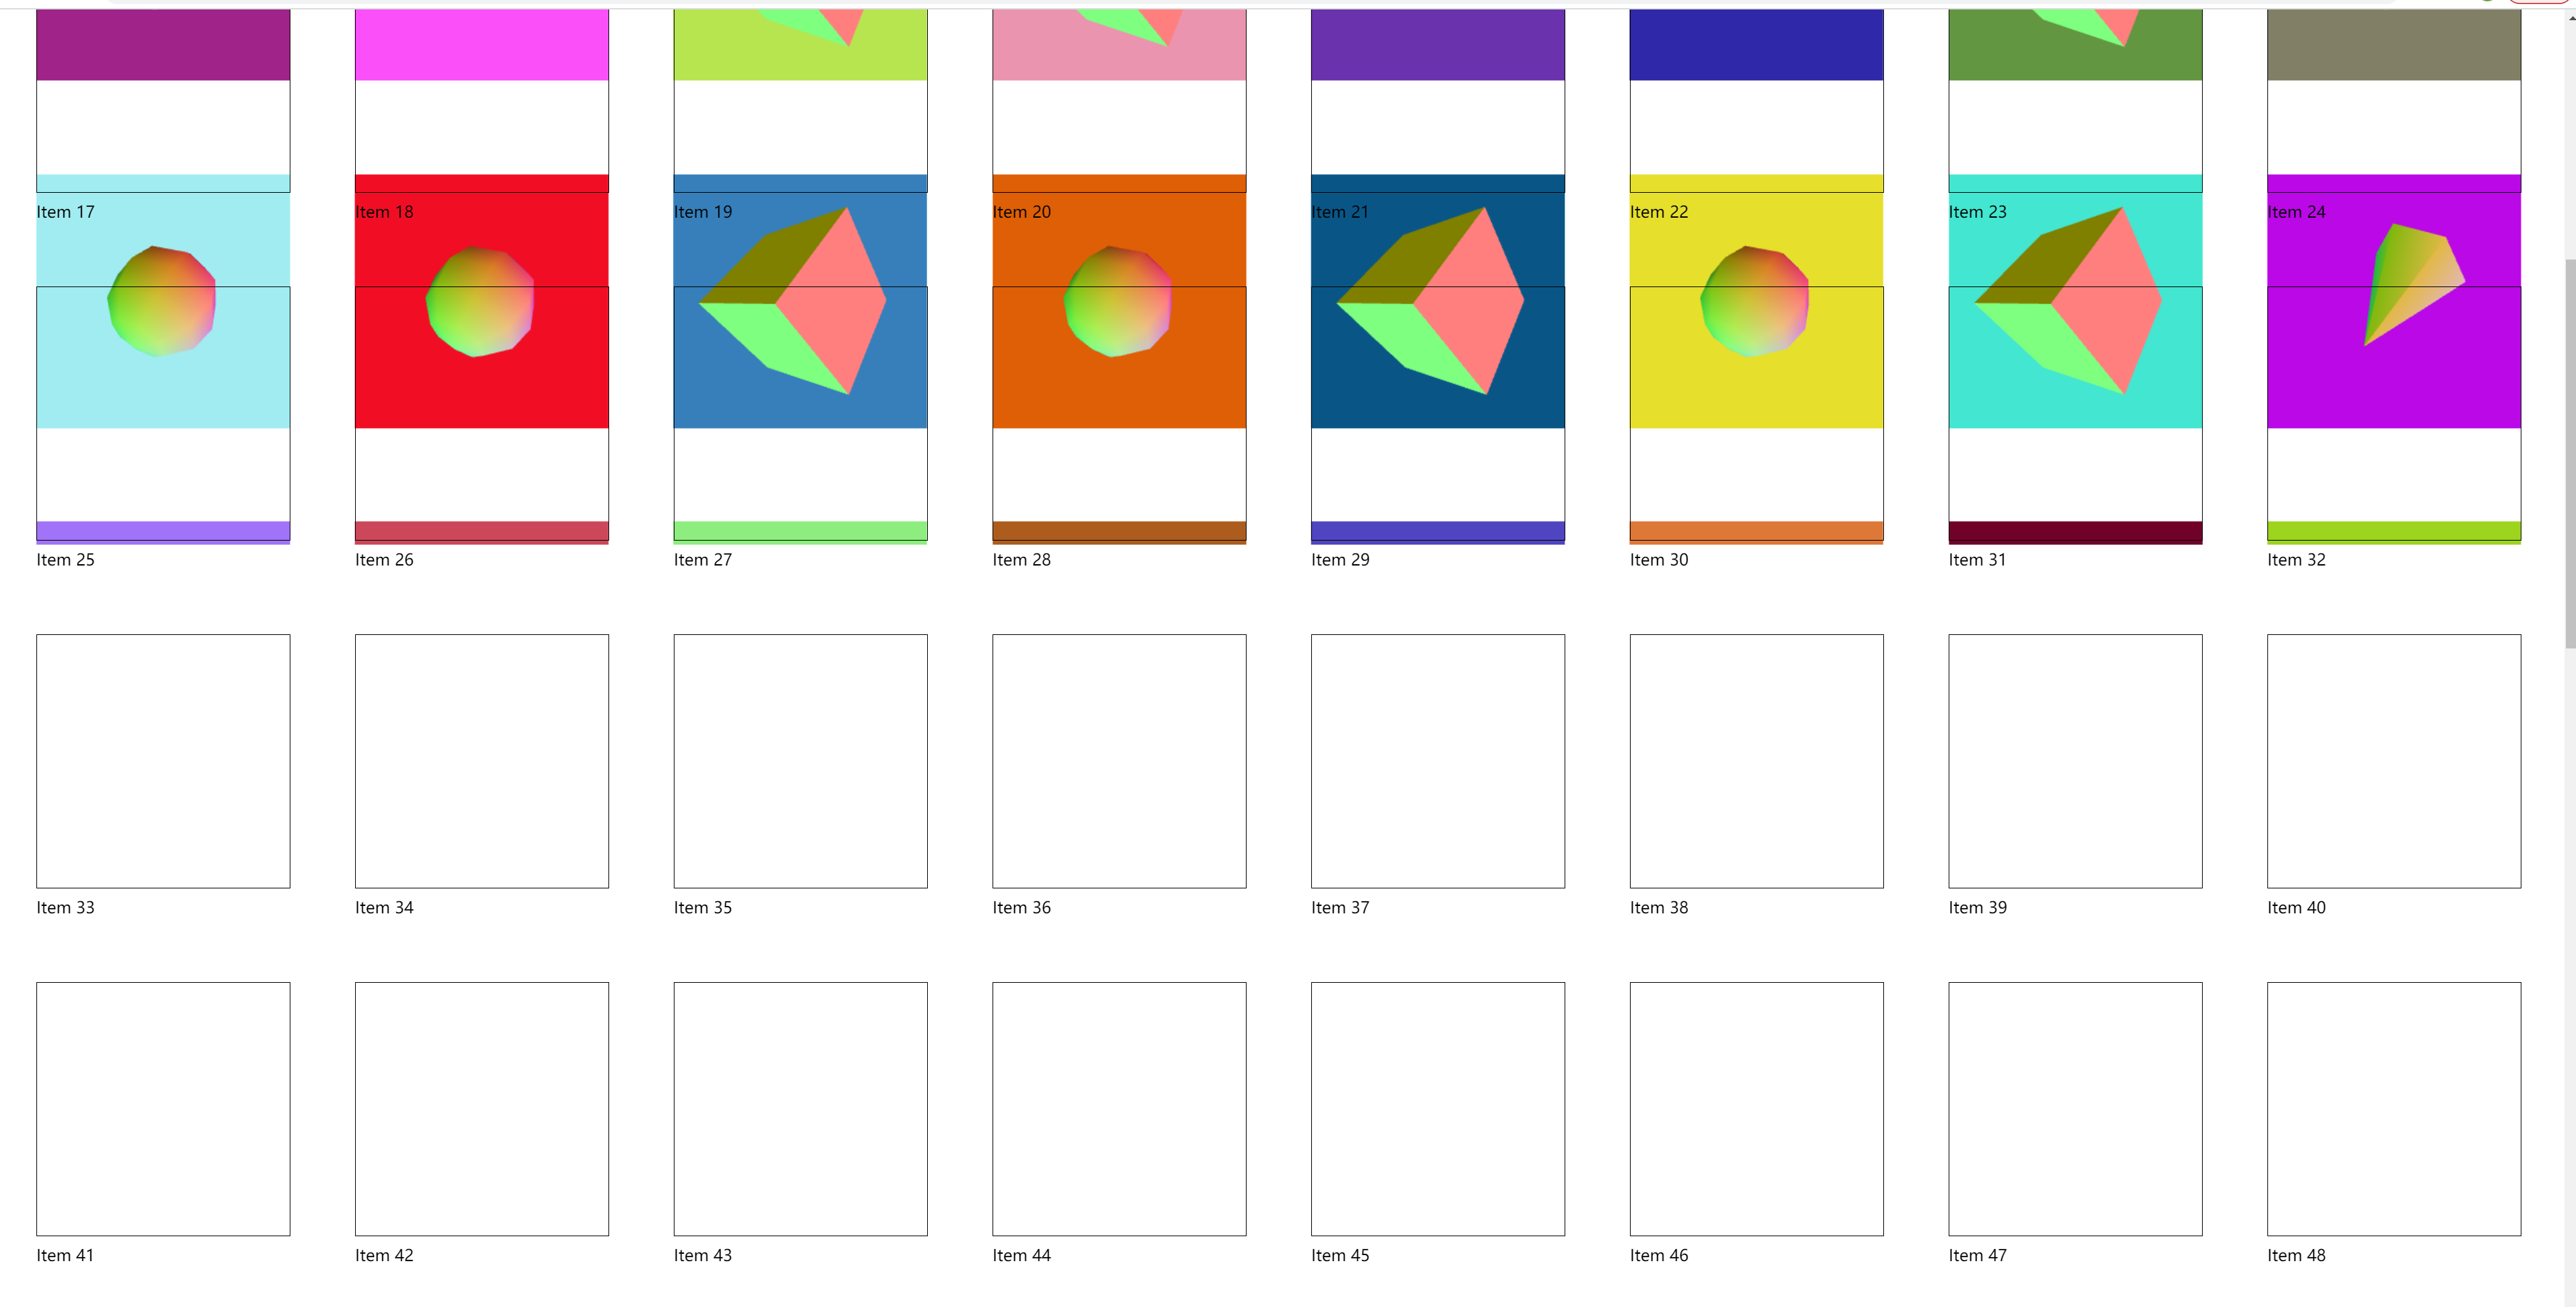
# 我们为什么会用下面的这行代码移动画布?
gl.canvas.style.transform = `translateX(${window.scrollX}px) translateY(${window.scrollY}px)`;
这是因为,如果我们在页面上滚动,希望画布跟随页面一起滚动,如果不添加上面的代码,则会出现如下所示的问题,画布将与 HTML 同步滚动,但我们想要绘制内容的新区域将是空白的。
demo地址 多画布 (opens new window)
参考文档
WebGL Multiple Views, Multiple Canvases (opens new window)